| |
| |
| Assembly Programming: A Beginners Guide |
| Author:
Amit Malik |
| |
| |
| |
|
|
|
| |
| |
| |
|
|
| |
| |
|
|
This article is specially designed to help beginners to understand
and develop their first Assembly Program from
scratch. Through step by step instructions it will help you to use
tools, setup the environment and then build sample 'Hello
World' program in Assembly language with detailed
explaination. |
| |
|
|
|
|
This article is the part of our free "Reverse Engineering & Malware
Analysis Course" [Reference 4]. It is written as pre-learning guide
for our session on 'Part 4 - Assembly Programming Basics' where in
we are going to cover Assembly Programming from the reverse
engineering perspective.
Here along with programming assignment experts from AssignmentCore we will be demonstrating
Assembly programming using MASM as it is the Microsoft assembler and
provide much flexibility when it comes to development on Windows
environment over various other assemblers like NASM etc. |
|
|
|
|
|
|
|
- MASM [Reference 2] - MASM is a Microsoft
assembler.
- WinAsm [Reference 3]
- WinAsm is IDE. It provides a nice interface for coding and
moreover you don't have to type different-2 command for assembler
and linker to compile a binary, with one click it will generate EXE for you.
|
|
|
|
- MASM - By default MASM tries to install itself
in windows drive mostly c drive but you can install it in any
Drive/directory. We need the full path of MASM installation to
configure WinAsm so note down the drive/directory where you
installed MASM.
- WinAsm - Download and extract the WinAsm
package. WinAsm comes with all files you require so you don't have
to install it. Just copy the folder to "c:\program files\" and make
a shortcut to desktop so that you can access directly from desktop.
|
| |
|
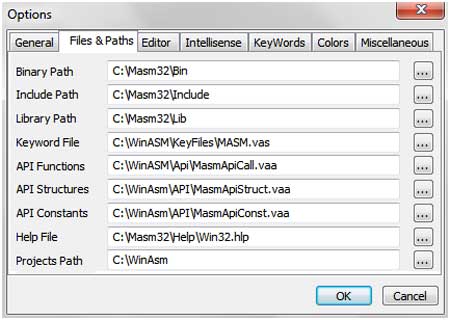
Launch WinAsm by double clicking on the shortcut created on the
desktop. In order to integrate it with MASM we need to setup the MASM
path in WinAsm configurations. Here are the steps,
|
- Click on the tools tab
- In tools click on options
- In options click on file & path tab
- Change the all entries with path to MASM installation
folder
- Click on Ok.
|
 |
| |
| After this you should be able to write programs in WinAsm. |
| |
| |
| |
|
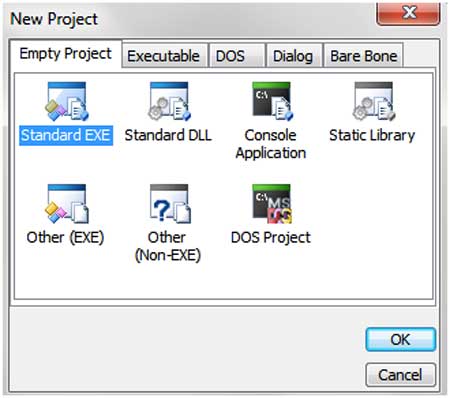
| Launch the WinAsm window, click on the "file" tab. Then click on the
new projects and it will show you couple of options as shown below. |
|
|
 |
| |
- Console Application - For creating
console (command-line) applications
- Standard EXE - For creating GUI based
applications
|
| Here we willl use Standard EXE because we want to
make a GUI Application. Now you will see the editor window in which you
can write your programs. |
| |
| |
| |
|
| Here is a typical assembly program
structure, |
- Architecture - Define the architecture because assembly is
Hardware (processor) dependent language so you have to tell to
assembler the architecture for which you are writing your program.
- Data Section - All your initialized and uninitialized
variables reside in data section.
- Code Section - Entire code of your program reside in this
section.
|
| Now we will write a program that will display the message box saying
"Hello World!" |
| |
Code:
;------------Block 1----------
.386
.model flat,stdcall
option
casemap:none
;------------Block 2----------
include
windows.inc
include user32.inc
includelib user32.lib
include
kernel32.inc
includelib kernel32.lib
;------------block
3----------
.data
szCaption db "Hello",0
szMsg db "Hello
World!",0
;------------Block 4----------
.data?
retvalue dd ?
;------------Block 5----------
.code
start:
invoke MessageBox,NULL,addr szMsg,addr szCaption,MB_OK
mov
retvalue,eax
xor eax,eax
invoke ExitProcess,eax
end start
|
| |
| I divided the above code in 5 blocks.
Below I will explain the purpose and functionality of each block. |
|
| |
| |
1).386
2).model
flat,stdcall
3)option casemap:none |
| |
#1 - This line defines the architecture for which we want to make
this program. (.386) represent Intel architecture
#2 - This line
defines the model and the calling convention that we want to use for
this program. We will explain it in detail in our "Assembly Basics"
session.
#3 - function names, variable names etc. are case sensitive |
All these three lines are required in each program. |
| |
| |
1)include windows.inc
2)include user32.inc
3)includelib user32.lib
4)include
kernel32.inc
5)includelib kernel32.lib |
| |
include and includelib are two keywords. Include is used with .inc
files while includelib is used with .lib files.
.inc files are header
files. for eg: windows.inc is windows.h, you can convert any .h file
into .inc file using H2INC utility that comes with MASM.
.lib files
are required by linker to link the used functions with the system dlls.
In our program we used two .lib files (user32.lib & kernel32.lib). For
each .lib file we have to include its corresponding .inc file. |
| |
| |
1).data
2)szCaption
db "Hello",0
3)szMsg db "Hello World!",0 |
| |
| .data is the section for initialized variables. Every initialized
variable should be initialized in this section. In our code we have two
variables of char type <string>. |
| |
| Syntax: <variable_name>
<type> <value> |
| |
For eg: in #2 szCaption is the variable name, db is the type means
char type, "Hello", 0 is the value.
Here important point to note is that
every char or string value should be terminated with zero (0).
|
| |
| |
1).data?
2)retvalue
dd ?
|
| |
| .data? is the section for uninitialized variables. Every
uninitialized variable should be declared in this section. |
| |
| |
1).code
2)start:
3)invoke MessageBox,NULL,addr szMsg,addr szCaption,MB_OK
4)mov
retvalue,eax
5)xor eax,eax
6)invoke ExitProcess,eax
7)end start |
| |
.code represents the start of code. All your code should be written
in this section
#2 start: It is a label and it is like main
function. You can name it anything but you have to use the same name in
#7 otherwise linker will generate an error.
For e.g.:
main:
...
end main
#3 invoke - is the keyword, its operation is similar to
"call". But in call you have to manually push parameters on the stack
while invoke will do everything for you.
|
Syntax: function_name
parameter1, parameter2, parameter3, etc.
|
| |
In our code MessageBox is the API from user32.dll and it requires 4
arguments.
Here important point to note is that we used "addr" with
some of our variables. addr will give address of the variable instead of
its value, it is like pointer in c.
#7 end start - it says the end
of the code and file. |
| |
| |
Now paste the above code in WinAsm and click
on "make" tab, in "make" click on "Assemble".
After that click on "link" which will be the executable for
this program.
Finally run the EXE file by double clicking on it, it should display "Hello World!". |
| |
| |
| This is a basic program to help you to learn Assembly Language in
most easier way. For more advanced details refer/attend our FREE
Reversing/Malware Analysis course [Reference 4] |
| |
| |
| |
|
-
Icezelion's Win32 Assembly Tutorials
- MASM - http://www.masm32.com/
- WinASM -
http://www.winasm.net/
- Reverse Engineering & Malware
Analysis Course
|
| |
| |
|
|
|
| |
| |
| |
| |
| |
| |
| |